How to reprogram your big red button
This guide will walk you through the steps required to set up your computer to program the Teensy board, which is the brains behind your Button. Then you'll learn how to load new code onto the board. This can change the action of the button.
In this guide we will download and install three programs to your computer, open them, change two settings, open a file, click a button and push another button. It's as simple as that. It shouldn't take more than half an hour, and once you've done it the first time, programming your button will take less than five minutes.
This can also be used for reprogramming any style of our buttons. The button will be different, but the circuit board and process will be the same.

Step 1a:
First, gather your tools. You'll need a #2 Phillips Screwdriver. Got that? Good. That's all the tools we'll need.

Step 1b:
Turn your button over and remove the four Phillips screws from the bottom of the case.

Step 1c:
Set the screws and case bottom aside.

Step 2:
Go to http://pjrc.com/teensy/loader.html
Download the Teensy Loader program by selecting your Operating System.
Install the Teensy Loader Program.

Step 3:
Go to http://www.arduino.cc/en/Main/Software
Download and install the Arduino software by selecting your Operating System.

Step 4:
Go to http://pjrc.com/teensy/td_download.html
Download and install Teensyduino.
This program will ask you where you installed your Arduino software. On a Mac, it's probably in your Applications folder. If you don't know, search in Finder for Arduino.
There is a step by step installation guide for Teensyduino at http://pjrc.com/teensy/td_download.html

Step 5a:
Start the Teensy Loader program, then start the Arduino program.
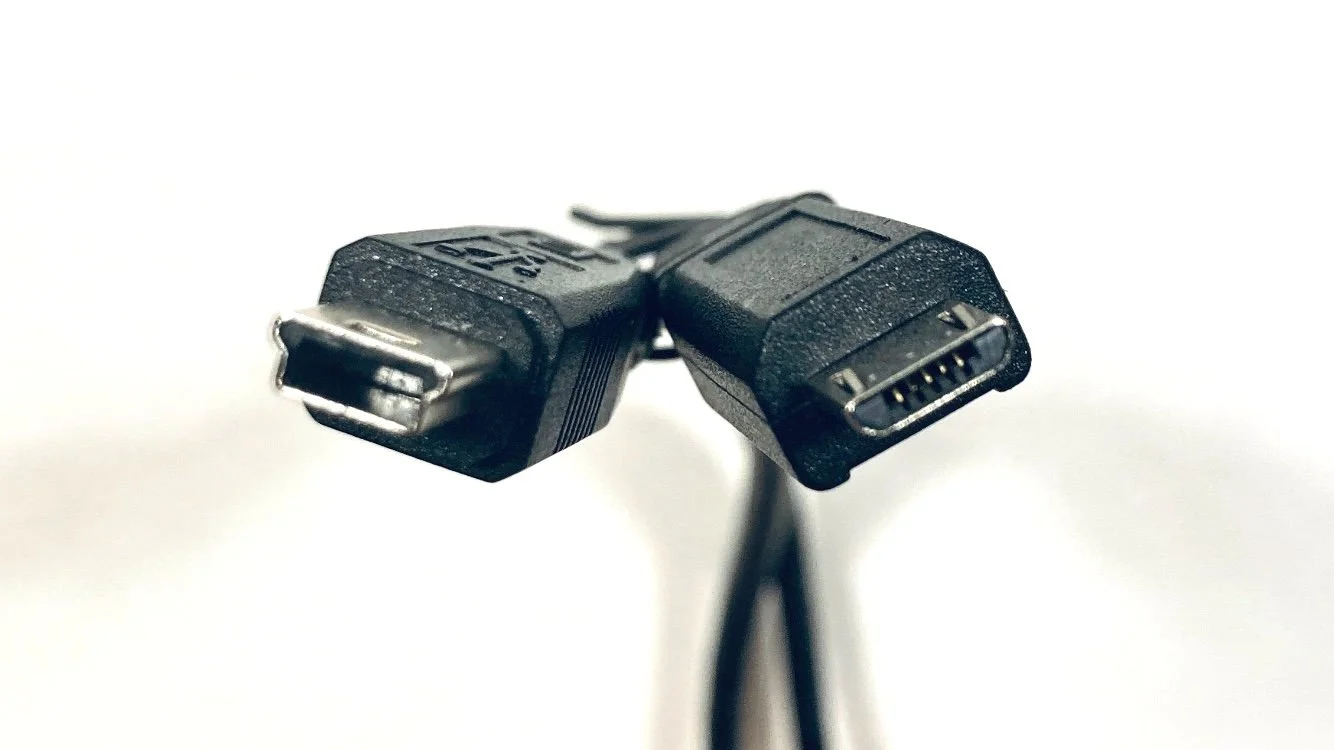
Step 5b:
Determine which circuit board you have by looking at the USB cable attached to it, and comparing it to this picture.
If it’s the one on the left, it’s a Mini-USB, and you’ll select Teensy 2.0 in the next step.
If it’s the one on the right, it’s a Micro-USB. If you bought your button in 2022 or before you’ll select Teensy LC in the next step. If you bought your button in 2023, you’ll either use Teensy LC or Teensy 4.0. It will most likely be Teensy 4.0, so try that first.

Step 5c:
In the Arduino program, from the Tools menu, under Board, select the board you determined you have in step 5b (either Teensy 2.0, Teensy LC, or Teensy 4.0)

Step 5d:
From the Tools menu, under USB Type, select Serial + Keyboard + Mouse + Joystick.

Step 6a:
This is where we load the code (called a sketch) into Arduino. If you're following this guide, you were probably also emailed a file containing the code you want to load on your board. If you haven't already, download that file to your desktop now.
Double Click the file to open it. You will get a dialog box from Arduino asking if it can put the file into a folder. Click ok.

Step 6b:
The sketch will open in a new window.

Step 7:
Plug the Big Red Button's USB cable into your computer's USB port.
Kitty helpers are optional for this step, but might be good for knocking your screws or other items on the floor.

Step 8a:
Click the Verify button in the Arduino program. It's the one that looks like a check mark in the upper left corner of the window.
This will make Arduino compile the sketch. Wait until this is completed. It may take a minute.

Step 8b:
When Arduino says "Done Compiling" you can move on to the next step.
If you get an error that contains text like "Board: "Arduino Uno"" and "'Keyboard' was not declared in this scope", go back to step five and be sure to complete parts B and C of that step.

Step 9a:
Now it's time to push the button on the Teensy Board.
Note: This is not the big red button. This is a small button attached to the board itself. See the pictures for its location.
Newer buttons use heat shrink instead of kapton tape to cover the circuit board. You should be able to see the button by looking in the end of the head shrink. You can easily press the button through the heat shrink with your finger. DO NOT put anything inside the heat shrink to push the button or damage to the button may occur.

Step 9b:
You will see the Teensy Loader program do some things, and it will briefly say "Reboot Ok" when it is done before returning to its normal state.
At this point, your button should work. Test it before putting the bottom on the case.
To test the output of your button, go to http://www.keyboardtester.com/tester.htm...
If it doesn't work, try shutting down Arduino and Teensy Loader and restarting them. Arduino should open with the last sketch you loaded in it. Click verify and press the button on the teensy. Now test the button again.
People frequently message me with an error, and most of the time it’s because they did not correctly do all the parts of step 5. Please go back and be sure that you have done each part of step 5 if you’re getting an error.
If you have any problems, feel free to contact me at dave@usbbuttons.com